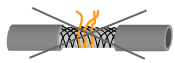
2.6.5 Connection of shielding to equipotential bonding
Several options are available for establishing the large-area connection between the shielding and the equipotential bonding system. The following figure shows various techniques that have proved themselves in the field.
Fig .:Techniques for connecting the cable shield to equipotential bonding
Ensure that the PROFIBUS cable is not pinched by the shield connection clamp. Use a shield clamp that fits the cable diameter. Pinching can deteriorate the transmission characteristics of the PROFIBUS cable.
The following must be observed when making the shielding connection:
Only remove the PROFIBUS cable outer insulation where required for bonding. PROFIBUS cable is weakened where the sheath is removed.
Please scroll with your mouse over the display!
Ensure that you do not damage the braided shield when the outer insulation is stripped from of the PROFIBUS cable.
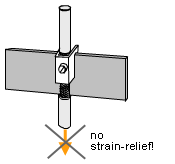
Do not use the shield connection as a strain relief since this may reduce the effectiveness of the bonding and may cause the cable shield to be damaged. An exception would be when using parts that are specifically designed for this purpose.
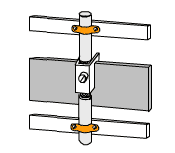
To protect the weakened PROFIBUS cable from damage, it should be secured either side of the bonding connection.
Use only parts that match the diameter of the stripped cable.
The connection between the shield and the equipotential bonding must only be made using the braided screen. Many PROFIBUS cables also feature a foil screen. This foil must not be used for the connection. It is generally synthetically coated on one side to improve stability and the plastic coating acts as insulation.
Do not attach the equipotential bonding rail to painted surfaces. Galvanized or plated surfaces are well-suited for this purpose.
Use tinned, galvanized or other galvanically treated material. Ensure the surface is protected against corrosion to ensure a permanent contact.